

Frontend integration
DioscHub ships its chat as a single web component, <diosc-chat>. You load it onto a page, place it
where you want, and control it from your app with one global function: diosc(). The widget code is
served from your DioscHub instance at runtime. You embed a small loader, not the whole bundle.
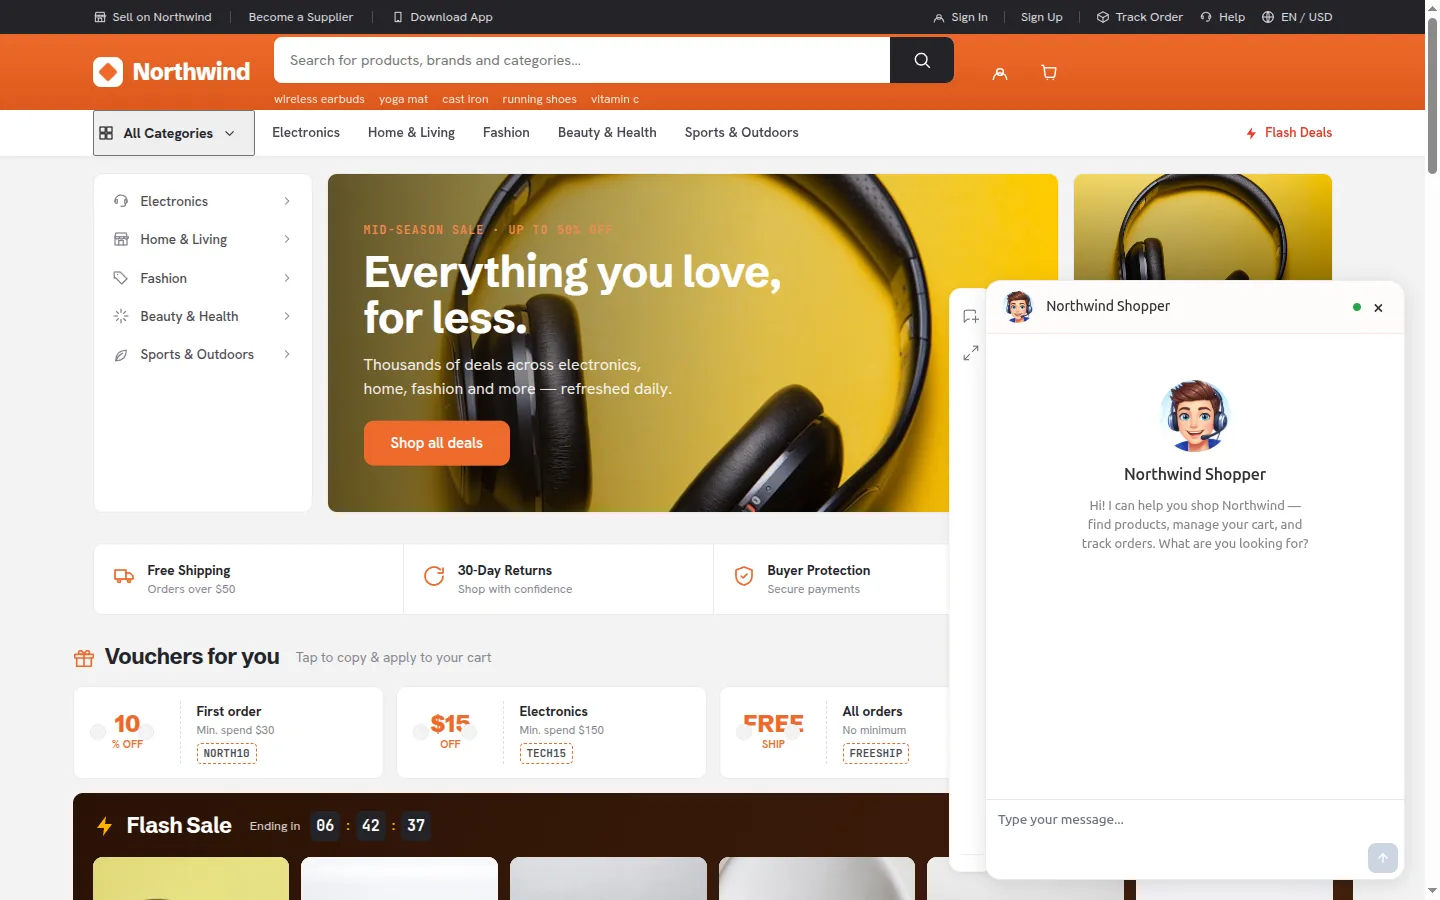
The <diosc-chat> widget embedded on a host page. It renders as a floating launcher that opens into this panel; you place and control it from your own app.
Load the widget
Section titled “Load the widget”Pick the path that matches how your frontend is built.
Paste the loader script. It mounts <diosc-chat> for you and resolves everything else from your embed
key server-side. You don’t pass an assistant ID or a backend URL.
<script src="https://your-hub.example.com/api/embed/YOUR_EMBED_KEY/loader.js"></script>That’s the whole integration for a static page.
Install the loader package. It’s a tiny dependency with no runtime libraries of its own:
npm install @dioschub/clientLoad the widget once, then render <diosc-chat> wherever you want it in your layout:
import { loadDiosc } from '@dioschub/client';
const { diosc, ready } = loadDiosc({  backendUrl: 'https://your-hub.example.com',  apiKey: 'YOUR_EMBED_KEY',});
await ready; // resolves once the widget code has loaded<diosc-chat></diosc-chat>loadDiosc returns the typed diosc() function and a ready promise. Call loadDiosc once for the
lifetime of the page; calling it again is a no-op.
Drive the widget
Section titled “Drive the widget”Once loaded, diosc() is how your app talks to the widget. You pass a command name and its arguments.
diosc('open'); // expand the widgetdiosc('close'); // collapse it to the launcherdiosc('toggle'); // flip between the twoTo react to what happens inside the widget, subscribe to its events:
diosc('on', 'session:upgraded', (session) => { // the anonymous visitor just signed in, so refresh your UI});diosc('onAny', handler) receives every event if you’d rather route them yourself. The full event
catalogue lives in the Web component API reference.
Session history
Section titled “Session history”The widget has a built-in history UI — past conversations, rename, pin, and new-chat — gated by the
sessionHistory and multipleSessions Role features (see Assistants &
Roles). When those features are granted the visitor’s role, the history
panel appears with no work on your part.
When the deployment’s retention window
is on, and session history is licensed (Pro or Enterprise) and granted, the history panel marks a
conversation that will be deleted within 7 days with “Deleted in N days. Pin to keep.”, and the pin
button’s tooltip says whether pinned conversations are kept. Each
session in the list carries expiresAt (an ISO date, or null when it won’t be deleted), and the list
carries the retention in force (windowDays, keepPinned, pinnedLimitDays), on both the
session:list event and the REST list, if you build your own history UI. A conversation deleted while it
is open answers the next message with SESSION_NOT_FOUND.
If you want to drive sessions from your own UI instead, diosc() exposes the same operations:
startNewSession, loadSession(id), renameSession(id, name), pinSession(id, isPinned),
fetchSessionList / fetchSessionListViaREST (returns the list via the session:list event), and
searchSessions({ query }) / clearSessionSearch. Every command and its arguments are in the client
command API reference.
File uploads
Section titled “File uploads”When the visitor’s Role has the files feature, the widget shows an upload control and a Files
dialog with the user’s file library. You don’t configure upload limits in the widget: it reads them from
the hub (GET /api/files/policy) and enforces them on every way a file reaches it — the file picker, drag
and drop, paste, and files your client-side tools
return. The limits themselves are set by an administrator; see File storage limits, quota &
retention.
The widget checks a file against the hub’s policy before sending any bytes, and the hub checks again. When either refuses, the widget tells the user itself:
| Refusal | Code | What the user sees |
|---|---|---|
| The file is over the upload limit | FILE_TOO_LARGE | A toast naming the file and the limit, e.g. “report.pdf is larger than the 100 MB upload limit”. |
| The user’s storage quota is full | QUOTA_EXCEEDED | A toast such as “Storage full: 5.5 MB of 6 MB used” (or “Storage full: 20 of 20 files used”), and the Files dialog opens sorted largest first, showing each file’s size, search index and derived files so the user can free space. |
The file is an executable (hub only, 415) | FILE_TYPE_REFUSED | The upload is marked failed. There is no dedicated message, and uploadError carries no code for it. |
The file picker offers the types the hub lists (acceptedTypes in the policy), so there is no type list to
maintain in your page. It is only a hint for the picker: drag and drop, paste and client-side tool files are
not filtered, and the hub accepts any file that is not an executable, storing types it can’t read without
indexing them. To offer your own list, set accept on the <diosc-file-upload> element; when set, it
replaces the hub’s. See File types, kinds & parser limits.
There is no diosc('on') event for the refusals above — the widget handles them. (quota:exceeded is the
token-budget event, not storage.) Where the refusal reaches your
own code, it keeps its code and figures:
- A client-side tool that returns a
filegets{ success: false, error, code: 'FILE_TOO_LARGE', limitBytes }or{ success: false, error, code: 'QUOTA_EXCEEDED', usageBytes, quotaBytes, usageFiles, quotaFiles }when delivery is refused. - The
uploadErrorDOM event of the widget’s upload element bubbles out of the widget with{ fileId, error, code?, fileName?, limitBytes? }for a size refusal, orusageBytes,quotaBytes,usageFiles,quotaFilesandsizeBytesfor a quota refusal.
When file retention is on, the Files dialog shows “Expires in N days” on each file that will expire. Anonymous visitors get the upload control only when the Assistant allows anonymous file upload.
File status
Section titled “File status”After an upload, the hub indexes the file in the background, and every file reports its status. The Files dialog shows it on each row with no work on your part:
- one badge per state: Indexing, Ready, Search unavailable, No text, Stored only or Failed;
- the reason’s message, for example “Not searchable: the library is over its storage quota.”;
- the warnings, as a count with each code and location, for example “1 warning: page_unreadable (page 14)”;
- the step and a percent while the file is being indexed, for example “Indexing 33%” (or “Retrying 40%”);
- a Re-index button on Failed and Search unavailable rows. While the Re-index limit is spent it says how long to wait.
Rows update live: the hub pushes files:status each time a file’s status or progress changes, to every
widget the user has open on that Assistant. Your own code can subscribe to the same event:
diosc('on', 'files:status', (file) => { // { fileId, filename, mimeType, status, reason, warnings, progress, canRead, canSearch, isIndexed } if (!file.canSearch && file.status !== 'processing') flagFile(file.fileId, file.reason?.message);});files:updated still fires, with { fileId, filename }, to the session that uploaded a file once that
file is indexed. The fields, the reasons, Re-index and the event are covered in full in Chat files &
indexing.
Auth never goes through the widget
Section titled “Auth never goes through the widget”The widget carries no credentials. It never asks the user to authenticate, and you never pass a token
to diosc(). Instead, your backend hands DioscHub a scoped session for the already-signed-in
user, and DioscHub forwards that opaquely to your MCP servers. It’s never placed in the model’s
context. That binding is host-side and is covered in Identity & auth.
Customize it further
Section titled “Customize it further”The defaults work out of the box. When you’re ready to tailor the experience, each of these is a self-contained how-to:
Next: expose one of your own endpoints to the assistant in MCP server development.